Tiling a floor or wall can transform any room in your home, adding both style and value. Whether you’re working on a kitchen backsplash, a bathroom floor, or an entryway, achieving a professional finish is often easier than you might think with the right tools. One of the most important tools for any tiling project is the V Notch Trowel, which is essential for spreading adhesive evenly and ensuring that tiles adhere securely and consistently.
Why Choose a V Notch Trowel?
A V Notch Trowel stands out for its unique notched shape, which creates uniform ridges in adhesive, allowing tiles to sit perfectly level. The V-shaped notches are ideal for smaller tiles and mosaics, as they dispense just the right amount of thinset or mastic, preventing excess adhesive from oozing through grout lines. This not only saves you cleanup time but also helps ensure a stronger bond between the tile and the substrate.
How to Use a V Notch Trowel for Best Results
Mastering the use of a V Notch Trowel can make the difference between a DIY project that looks amateur and one that rivals professional work. Here’s how to get the most out of this essential tiling tool:
- Prepare the Surface: Make sure your substrate is clean, dry, and level. Any dust, grease, or bumps can affect adhesion and the final appearance.
- Mix the Adhesive: Follow the manufacturer’s instructions for mixing your thinset or tile mastic. Consistency is key for a smooth application.
- Spread the Adhesive: Use the flat side of the trowel to apply a thin layer of adhesive to the surface. Next, hold the trowel at a 45-degree angle and use the notched edge to comb the adhesive, creating consistent V-shaped ridges.
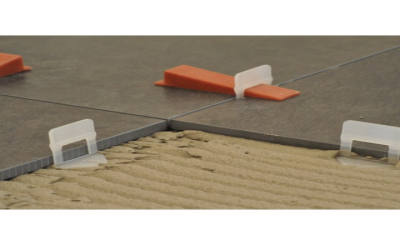
- Set the Tiles: Press each tile firmly into the adhesive, giving it a gentle twist to ensure full contact. The ridges formed by the notches allow air to escape and the adhesive to spread evenly.
- Check for Level and Alignment: Use tile spacers and a level to maintain even grout lines and a uniform surface as you work.
Benefits of Using a V Notch Trowel
- Even Adhesive Coverage: The notches regulate the amount of adhesive applied, preventing voids under tiles that could cause cracking or loose tiles over time.
- Clean and Efficient Work: Less adhesive overflow means less mess and quicker cleanup.
- Improved Tile Bonding: Consistent ridges help ensure each tile is fully supported, reducing the risk of future problems.
Tips for Success
- Select the right notch size for your tile. Smaller tiles generally require a smaller notch, while larger tiles may need a deeper notch to ensure full coverage.
- Work in small sections to prevent the adhesive from drying out before tiles are set.
- Always clean your trowel between uses to maintain sharp, well-defined notches for precise application.
Tiling projects can seem daunting, but with the proper preparation and the right tools, even beginners can achieve smooth and even results. By using a V Notch Trowel, you’ll ensure your tiles are laid evenly, securely, and beautifully, giving your home a polished, professional look that lasts for years. Whether you’re updating a single room or tackling a larger renovation, mastering this tool is a smart first step toward tiling success.